


Vegan Croissants: Best Recipe and Bakery Brands


It’s impossible to go anywhere in Paris without stumbling across another aromatic sheet pan of freshly baked croissants beckoning from open bakery windows. Such an obvious choice seems inevitable—but wait! What are croissants made of in the first place? Are croissants vegan? Here’s everything you need to know about these delectable French pastries including recipes and the best brands to try.
Today we’re taking the guesswork out of how to make these beauties thanks to Zacchary Bird’s recipe from his new cookbook The Vegan Baker. With his expert tips, homemade croissants come out perfect every time!
Pastry chefs train their whole lives to perfect the impossible array of golden, shattering crispiness in each coiled croissant masterpiece. This laminated dough has a lot in common with puff pastry, rising to even greater heights with a more tender interior thanks to the addition of yeast. Decadent, rich, yet dangerously easy to eat, skillfully made croissants are true edible works of art.

Table of contents
Are Croissants Vegan?
The short answer is: they can be! But croissants aren’t traditionally (or typically) vegan.
The French love affair with butter is no secret. The cuisine is practically synonymous with it, churning out more dairy-rich baked goods, pan sauces, and beyond than any other western country.
Unfortunately, that also means that conventional croissants are not vegan. They can contain anywhere between 35 to 55% butter by weight—outranking all other components with ease. Especially in their homeland, any croissant that isn’t specifically, clearly marked as vegan will not be.
Happily, that’s not the end of the story!
The remaining ingredients are standard staples for any sort of bread: flour, water, yeast, salt, and a touch of sugar. Now that there’s an abundance of options for plant-based butter, it’s a snap to convert even the most antiquated croissant recipes to make them completely dairy-free. A growing number of independent bakeries across the globe are now making vegan croissants on demand.
Types of Croissants
Like any popular pastry, there are as many variations on croissants as there are days of the year. Here are the most common types of croissants you’ll find:
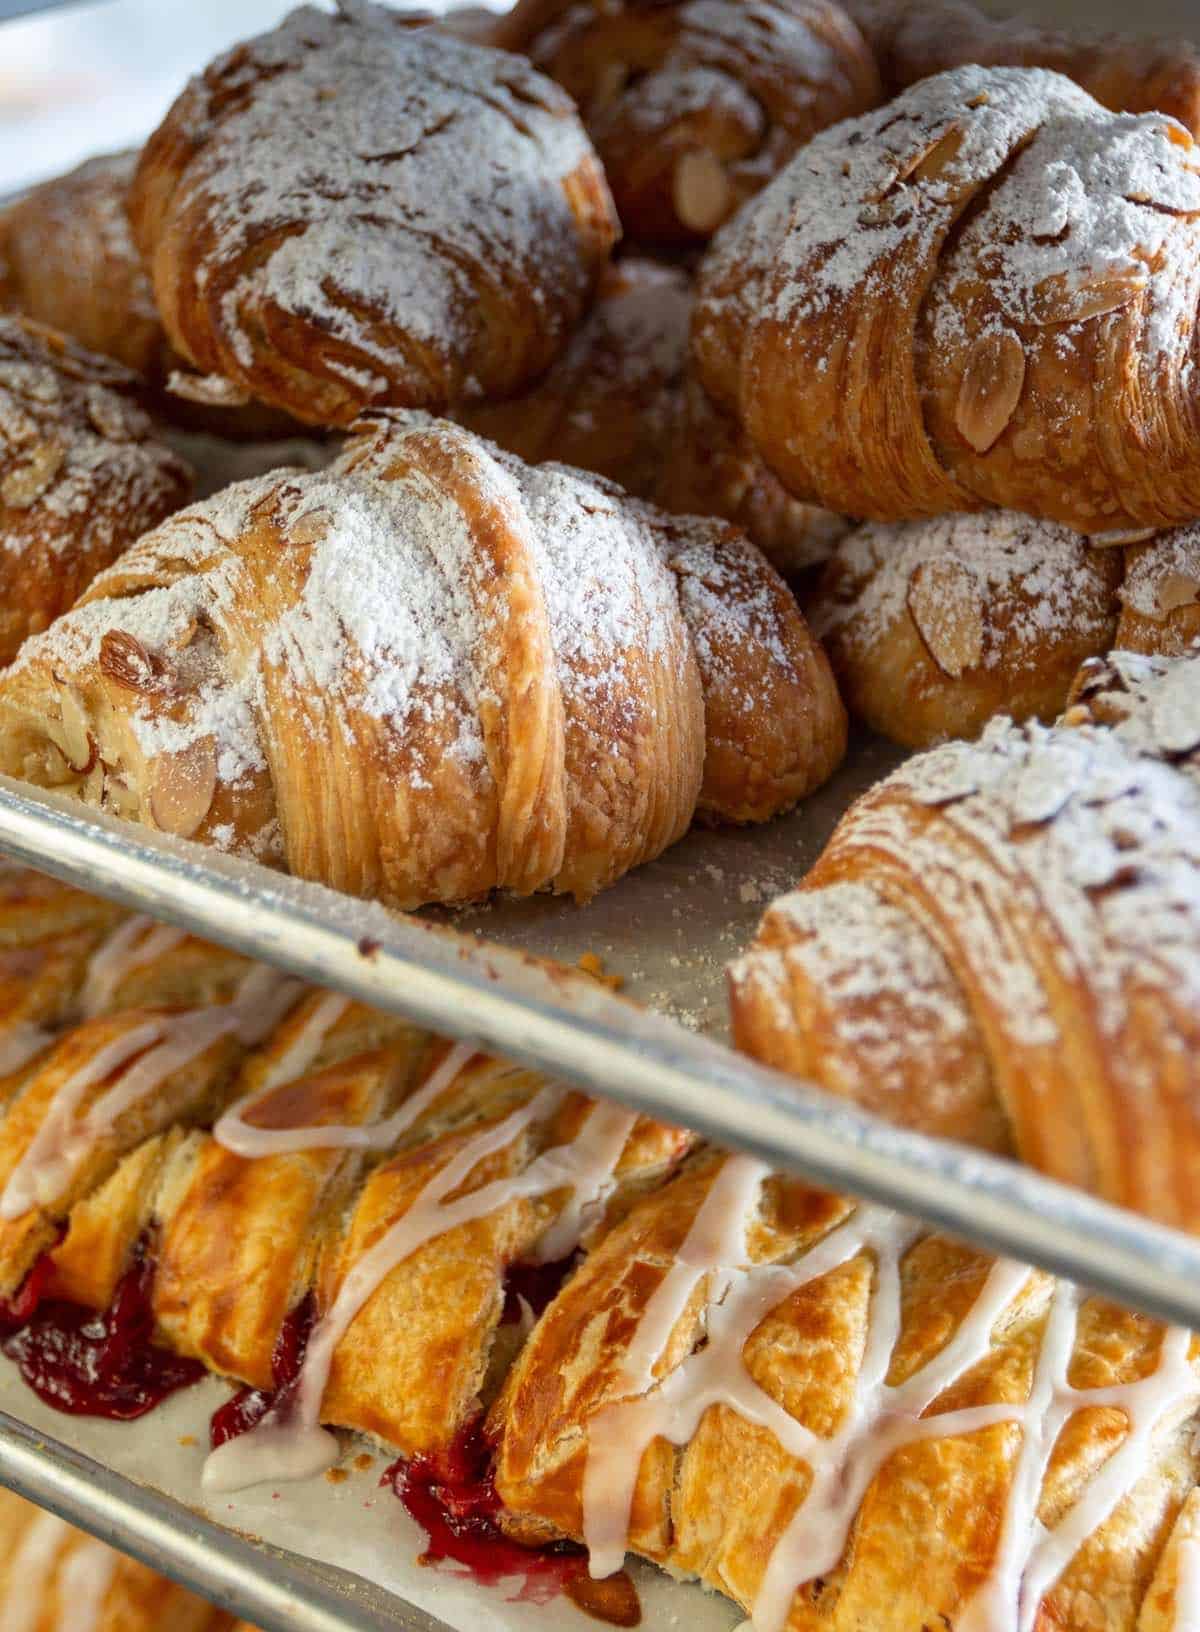
- Croissant au burre (classic croissants): The essential, savory approach that’s anything but basic, these are the iconic crescent moons with no added flavorings or fillings. They’re perfect for dressing up into sandwiches or dipping into hot coffee.
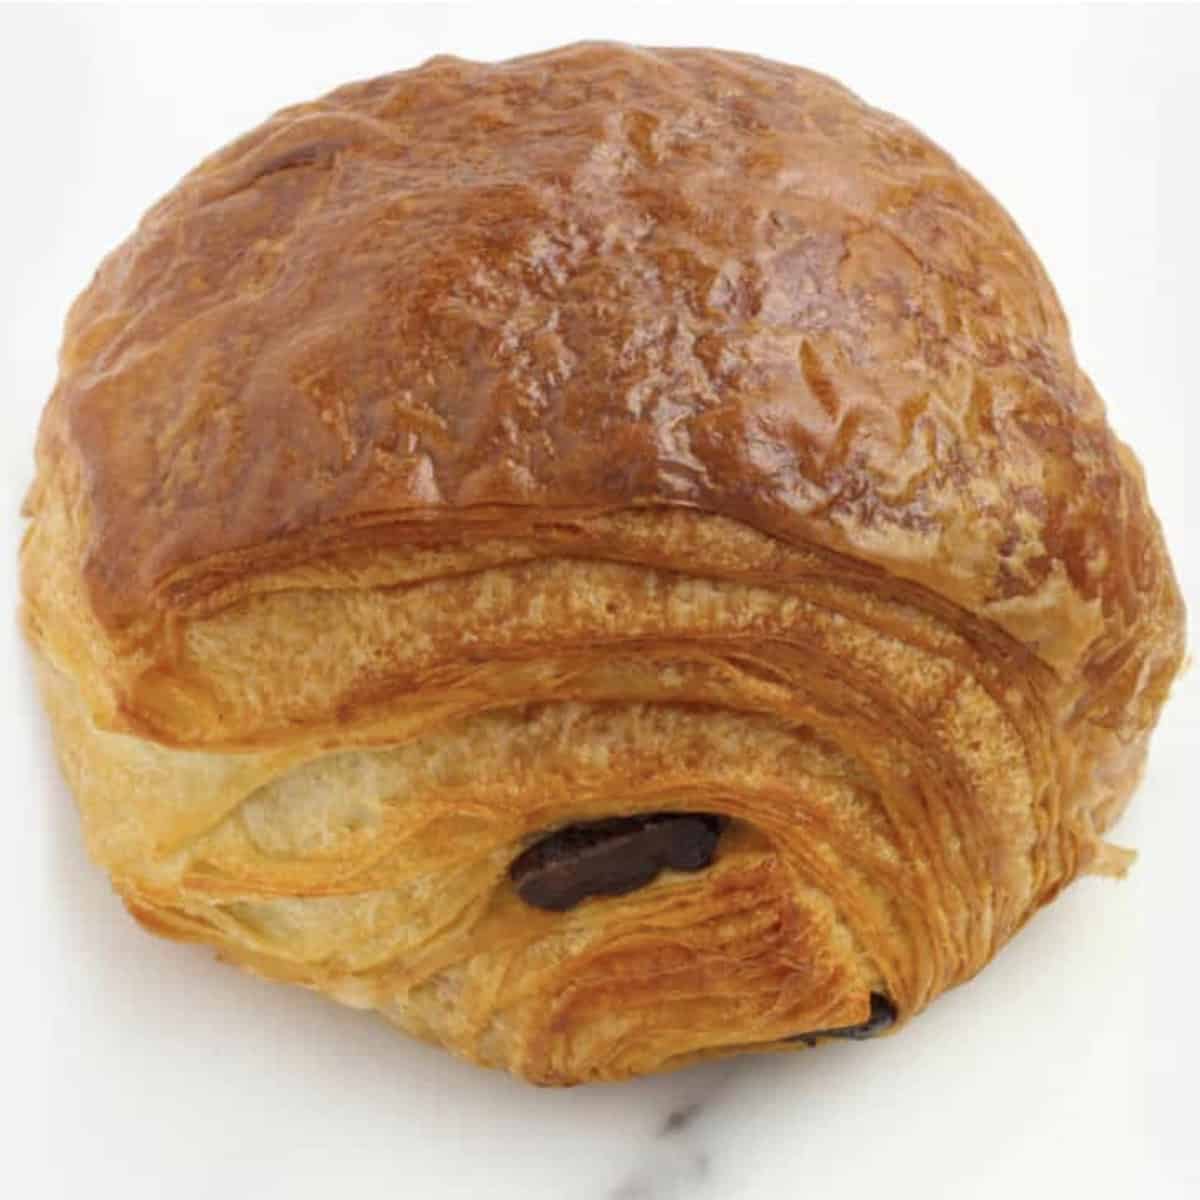
- Pain au chocolat (chocolate croissants): Everything’s better with a bit of chocolate. Wrap croissant dough around a baton of dark chocolate and you’ll agree, too. These are typically straight rectangles to accommodate that bar of solid cacao, which melts into a delightfully gooey interior.
- Croissant aux almandines (almond croissants): Swap out the chocolate for marzipan or sweetened almond pasta for a nutty twist on the theme. These are often topped with sliced almonds before being dusted with confectioner’s sugar for easy identification.
- Pain aux raisins (raisin croissants): Not everyone’s a fan of raisins, but for those who are, this fruity variant is a must-have. Rolled into flat spirals, they’re sometimes called “snail bread” in reference to their nautilus shape.
- Cronuts: A modern innovation by chef Dominique Ansel, it’s a hybrid croissant-doughnut that takes the iconic layered dough and deep fries it. Though many copycats quickly sprang up to capitalize on the concept, the term “cronut” is copyrighted by the original baker himself.
Store-Bought Vegan Croissants
When croissant cravings strike and a vegan bakery is nowhere to be found, don’t panic. There are more options waiting for you at the store than you may think!
Whole Foods Market Vegan Croissants
These are baked in-store every day, giving you the very freshest option available in mainstream markets. If you get lucky, occasionally you can find the unbaked dough in the freezer section to defrost and cook at will.

La Boulangerie Vegan Croissant Toast
This takes on an unconventional form as a sliced loaf of bread, complete with all the flaky layers you crave. It’s the perfect foundation for building decadent avocado toast or custard-like French toast, too.

Immaculate Baking All Natural Crescent Rolls
More like moon-shaped layered biscuits than true croissants, they don’t come close to a flaky bakery-style pastry, but they can absolutely work in a pinch. Find them in the refrigerated section near the dairy alternatives, packaged in a convenient little tube.
Pillsbury Original Crescent Rolls
Long a favorite “accidentally vegan” product, these refrigerated tubes of crescent roll pastry dough can be easily found at grocery stores nationwide. Though thicker and fluffier than the genuine article, it’s a reliable staple that makes a great base for other recipes as well. Pillsbury Crescent Rolls are used to make vegan “Pigs in a Blanket” and our Halloween Mummy Dogs.
Vegan Croissants at Local Bakeries
Whether you’re in the United States or meandering the streets of Paris, there are hundreds of bakeries all around the world that make vegan croissants. And they are getting easier to find all the time! You can even find croissants at online vegan bakeries that can ship to your door.
Here are just a few fantastic bakeries that carry vegan croissants:
- Frogs Organic Bakery (Southern California)
- The Good Good LA (Los Angeles, California)
- Timeless Coffee (Oakland and Berkeley, California)
Homemade Vegan Croissant Tips
Technique is everything when it comes to making croissants. It starts with two separate components, the dough itself and the “butter” block, which get folded together again and again, rolled thinner and thinner to form that matrix of gossamer, flaky layers. This is what defines a laminated pastry and is essential for making perfect croissants.
If this is your first attempt, don’t be daunted. Here are some tips to make it much smoother rolling:
- Use vegan butter that’s sold as a solid block, not a spread in a tub. Spreadable butter has much more water blended in, which will throw off the delicate balance for this recipe.
- Take your time and plan plenty of breaks. It’s not a particularly difficult process, but it is time-consuming. Go slow and know that you can always stash it in the freezer at any time for up to 6 months if you need to, until you’re ready to keep going.
- Chill out. Keep everything, from the dough to the kitchen counter, as cold as possible. We don’t want the vegan butter to melt until it hits the oven, so we can’t let it get too warm before then. This is the secret to making the ideal structure and texture.
- Every turn counts. Don’t forget how many folds you’ve finished halfway through the action. Keep a tally on paper or on your phone, especially if you’re multitasking along the way.
Vegan Croissant Recipes
For classic vegan croissants, check out the recipe card below, along with the step-by-step photos! Want to try more vegan croissant varieties? You can’t go wrong with these recipes:
- Easier Vegan Croissants employ a shortcut method that slashes prep time in half. It’s a great way to ease into your first croissant adventure.
- Gluten-Free Croissants seem like an impossible dream, right up until the moment you’re sinking your teeth into one. Skip the egg wash to make it instantly vegan.
- Puff Pastry Vegan Croissants use puff pastry as the ultimate food hack. No baking experience required! Just cut, roll, and instantly quell those cravings.
- Vegan Pain Au Chocolat (Chocolate Croissants) take pain au chocolat to the next level by blending cocoa directly into the butter block. It’s the ideal balance between bittersweet chocolate and buttery pastry in every bite.

How To Shape Vegan Croissants
Once your dough is ready, follow these step-by-step photos to cut and roll your pastry into beautiful croissant rolls!
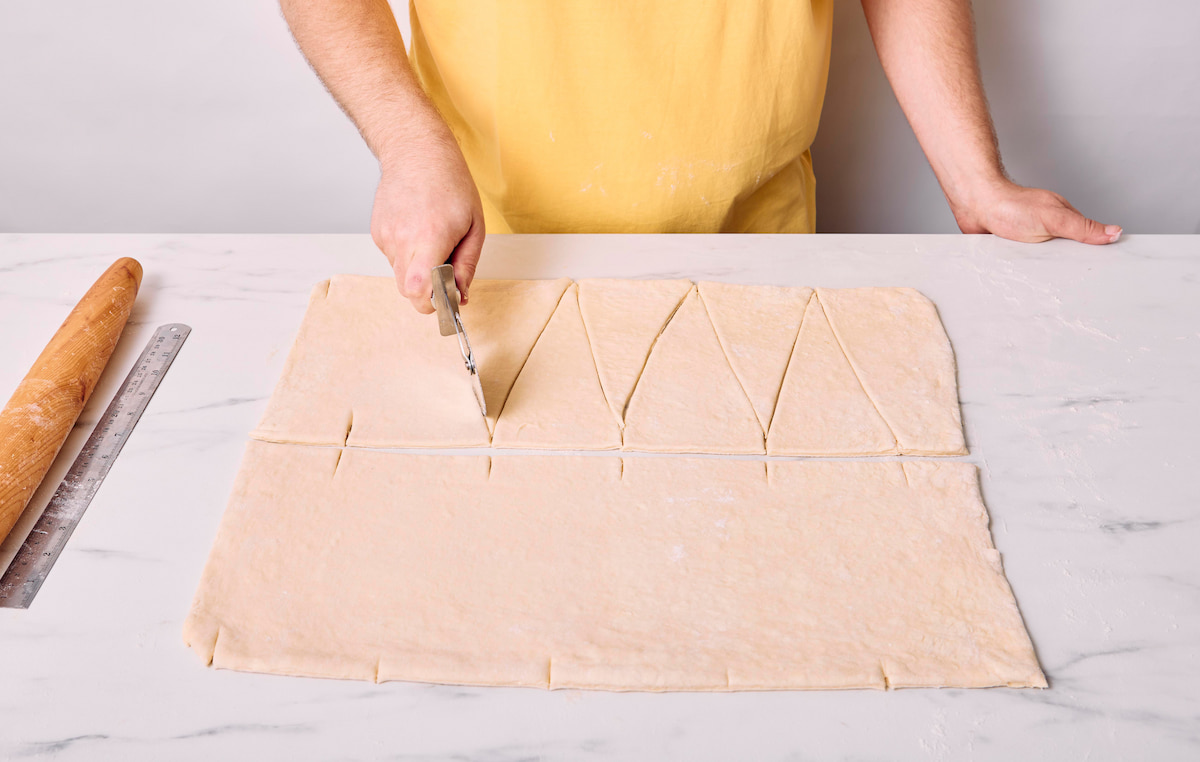
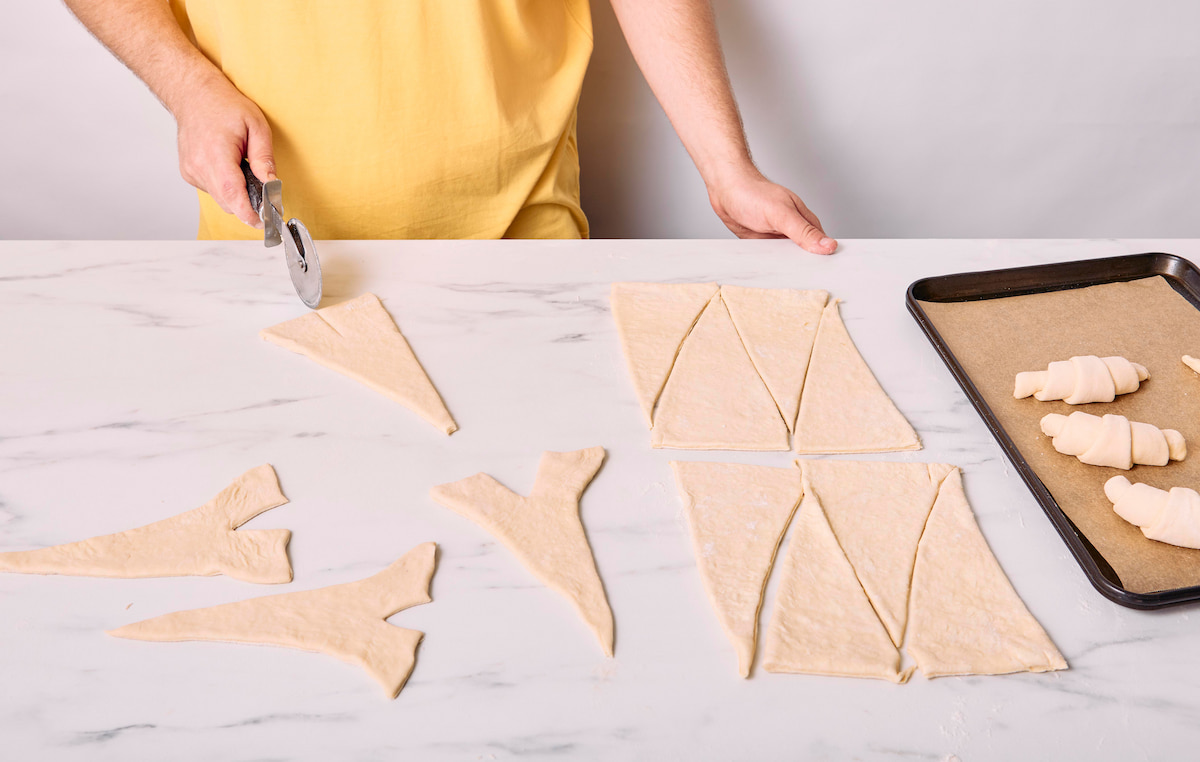
Step One: Trim the dough edges with a pizza cutter. Then, divide the dough in half lengthwise. Create small cuts, spacing them 4 inches (10 cm) apart along one edge of each dough half, and repeat on the other side, marking in between the initial cuts. Use these points as a reference to cut diagonally across the dough, forming long triangles. Carefully pull the edges to even them out.
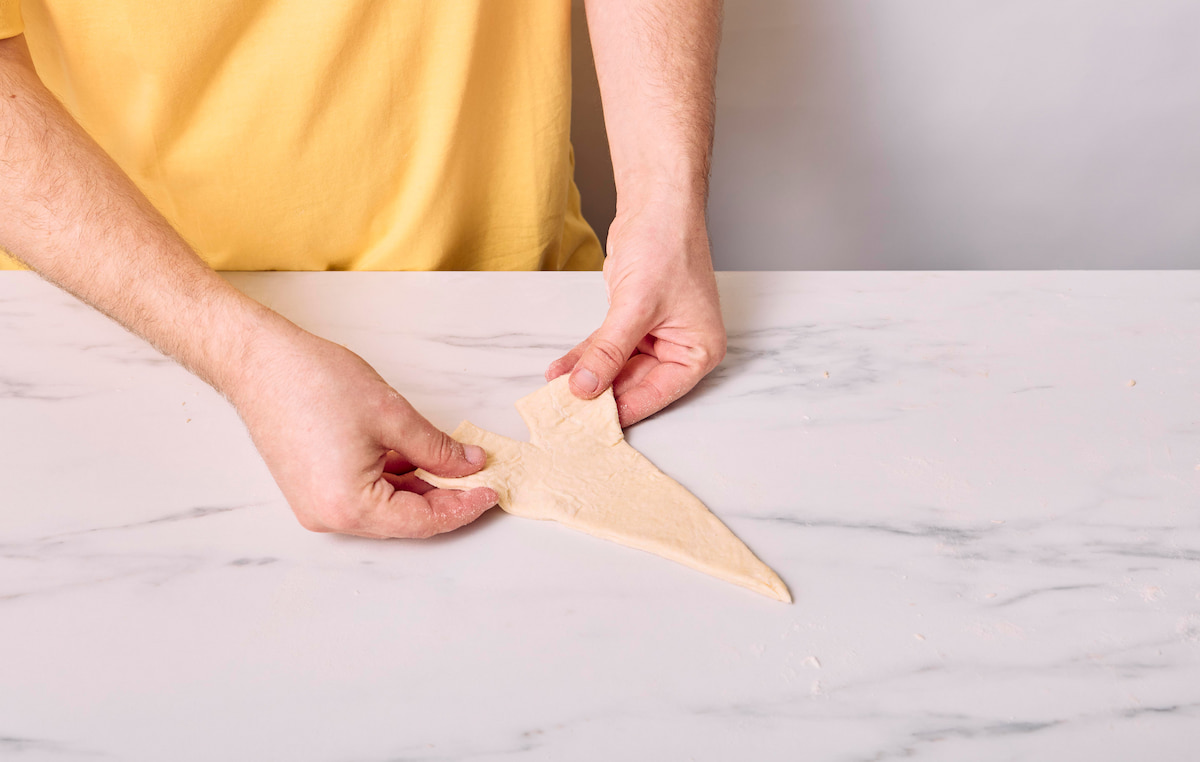
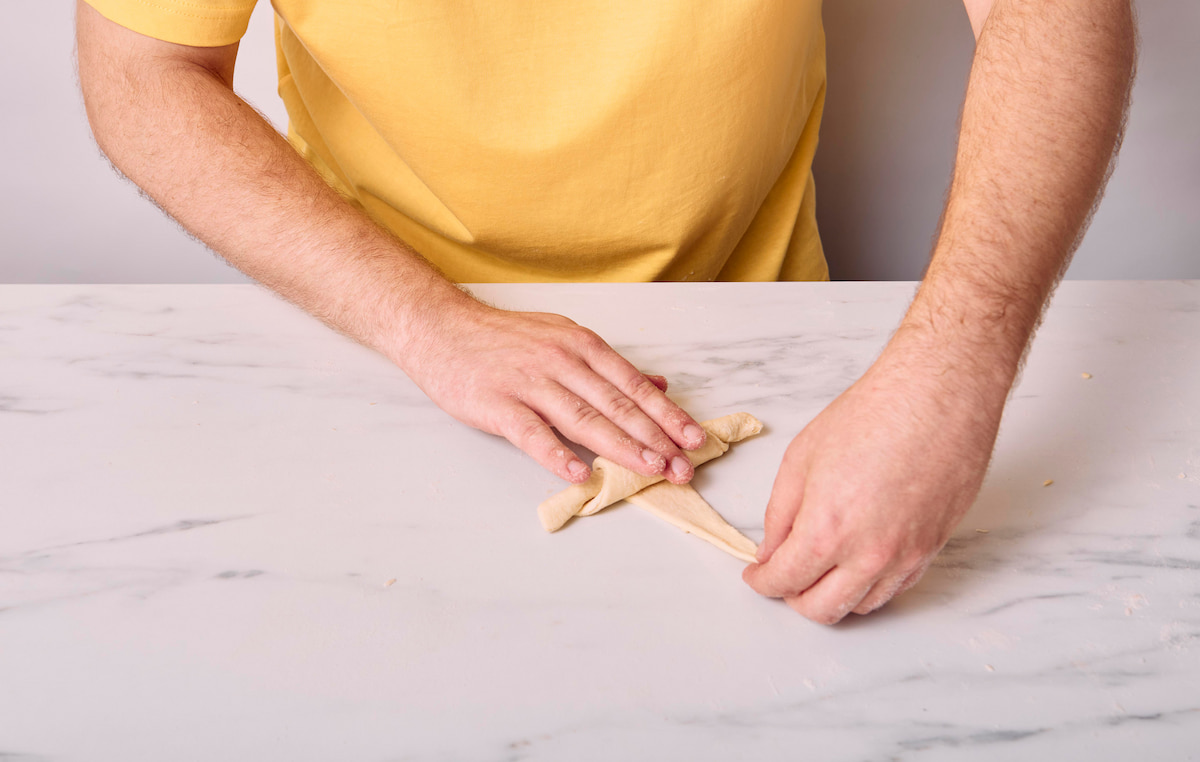
Step Two: Form the croissants. With the pizza cutter, make a small incision on the fat end of a dough triangle.
Step Three: Delicately separate the two edges to create a cute miniature Eiffel Tower shape! Remember that the tips of this “tower” will be visible as the outer edges of your croissants, so handle with care to maintain the laminated layers during this step.
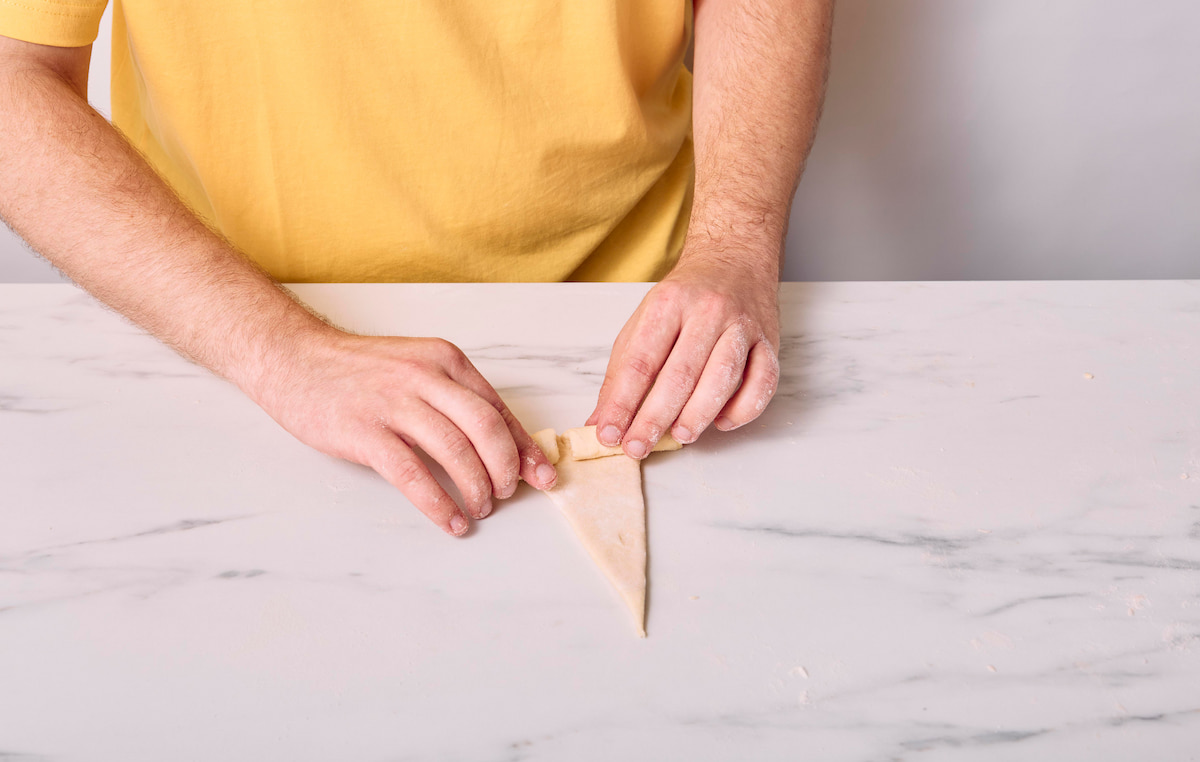
Step Four: Roll up both sides of the tower’s base, meeting at the end of the incision. Begin rolling the croissant gently with your palm, ensuring a firm but not overly tight roll to allow the layers room to expand. Use your hand or a rolling pin to secure the thinner end of the “tower” and gently pull it towards you to stretch the pastry as you roll it up.
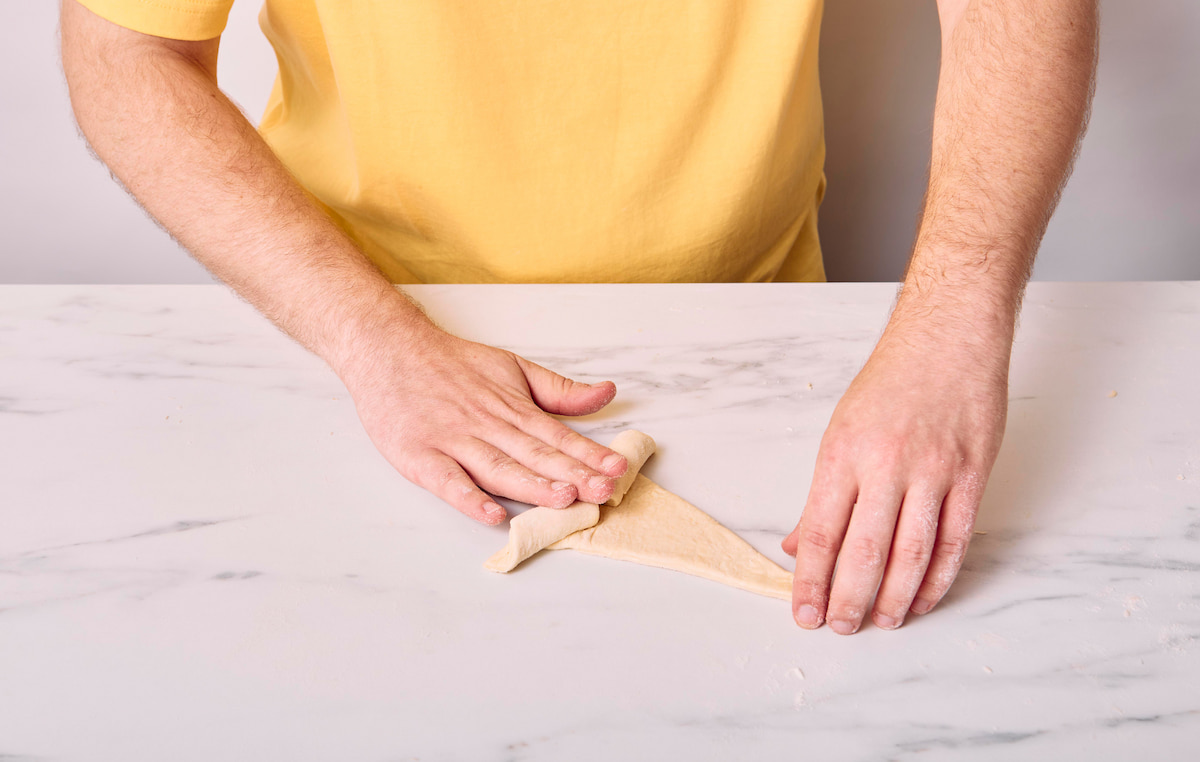
Step Five: As you reach the top of the “tower,” gently pinch the tip and roll the croissant to secure it in place. If necessary, use a small amount of water to reinforce the seal. Place the croissant on a baking tray with the tip side down, and gently shape it into a crescent. Continue this process until all the croissant dough is used, ensuring they are well spaced on the tray. If you plan to freeze some or all of the croissants for later, it’s a good time to do so now.
After another resting period to allow the rolls to rise, you’re ready to bake! Follow the recipe card below for more details.
Vegan Croissants

Equipment
- Rolling Pin
- Stand Mixer with a paddle attachment and dough hook
Ingredients
- all-purpose flour, for dusting
- 2 tablespoons vegan cream or plant-based milk, for brushing
For the dough
- 1 cup warm almond milk, (240 ml)
- 5 scant teaspoons active dried yeast, (14 g)
- 4 cups bread flour, (500 g)
- 3 ½ tablespoons granulated white sugar, (40 g)
- 2 teaspoons fine salt
- 3 ½ vegan block butter, cut into cubes, (50 g)
- ½ cup aquafaba, (110 ml)
For the Beurrage
- 1 ½ cups fridge-cold vegan block butter, about 3 sticks of butter (350 g)
Instructions
- Start with the dough. Place the warm milk in a bowl and add the yeast. Allow it to sit in the bowl for a few minutes until frothy. Add the flour, sugar, salt and butter to the bowl of a stand mixer fitted with the paddle attachment. Mix on medium speed for 1–2 minutes, until the mixture is finely distributed into crumbs. Add the aquafaba to the milk mixture, then slowly pour into the bowl as the mixer runs. When the dough comes together, switch to the dough hook attachment and knead for another 5 minutes. Wrap the dough in plastic wrap so that it is sealed, but not too tightly, as it will begin rising in the fridge. Leave to rest in the fridge for 6–12 hours.
- Prepare the Beurrage (butter). Spread a sheet of parchment paper over a large work surface that you can easily roll the dough out on later. Place the block of cold butter on top, and sandwich it between another sheet of parchment paper. Use a rolling pin to gently bash and flatten the butter. Using a sharp knife, trim the edges to form a smooth 6-inch (15 cm) square. Add the excess butter back on top, sandwich again between parchment paper and beat the butter into the square, so it is nice and even. Move to the next step ONLY when the beurrage has had at least 1 hour to collect itself in the fridge.
- Sprinkle flour over your benchtop. Unwrap the chilled dough, then roll it out into an 8-inch (20 cm) square. Score a square the same size as the beurrage in the center of the dough, then use a dough scraper to cut lines from each corner of the square to the outer edge of the dough. Leaving the center square intact, roll out the dough edges until they are large enough to fold over the center square. Place the unwrapped cold butter block in the center and fold each of the edges over the top, securely sealing the butter payload inside. Flip the dough over. Press or lightly beat all along the length of the dough with a rolling pin to squash it down and secure the layers. Wrap in plastic wrap and return to the fridge for 1 hour.
- Flour the benchtop again, ready to begin your first tour of the dough. You’ll need to complete three tours, each consisting of one letter fold. Unless your kitchen is really cold, completely chill the dough for 1 hour in the fridge or freezer between each tour, aiming to keep the dough at all times below 50°F (10°C). Use a pastry brush to dust excess flour from the pastry as you go, to keep an even dusting as you roll.
- Working either away from or towards you – not side to side – begin by pressing the rolling pin along the length of the dough. Repeat by pressing down the spaces left between the rolling pin indentations to flatten the whole thing, which will evenly begin to lengthen the dough in one direction. Check that both sides of the dough are adequately floured, then roll the dough carefully back and forth to give you more space to complete a fold. The more precise and neat you are at forming this rectangle and performing the first fold, the better your internal structure will be.
- Use a pastry brush to dust off excess flour, then give the dough a quarter turn so the long side is facing you. (If at any point the dough tears or butter is exposed, dust flour into the spot to ‘repair’ it, then return the dough to the fridge for at least 1 hour before proceeding.) Now perform the first letter fold. Fold the bottom third of the dough over, then fold the top third over this, as though you needed to fit the dough into an envelope. Again, you should still use a pastry brush to dust off excess flour! With the end of the rolling pin, tap lightly and evenly all over the top of the dough to secure the layers, completing the tour of the dough. Cover in plastic wrap and get the dough straight back in the fridge for at least 1 hour to cool back down.
- Repeat steps 5 and 6 twice more to complete three full tours.
- Complete a final dusting off of any excess flour, tap the top of the dough with the rolling pin to slightly lengthen, trim the very outer folded edges with a pizza cutter – and then the dough is finally ready … tomorrow! Cover in plastic wrap and refrigerate for at least 2 hours, or even overnight, as yet another test of your patience.
- Return the dough to the bench. Press the rolling pin along the length of the dough. Repeat for the spaces left between. Throughout this process, generously pour flour over the dough several times, dusting off just about completely. Now roll the dough in all directions into about an 18 in × 24 in (45 cm × 60 cm) rectangle, ¼ in (5 mm) thick. Flip the dough regularly and re-flour as you do so, using your forearm to flip the dough over and guide it back to the benchtop when it is getting thin and large. Rest the dough for 5 minutes before proceeding.
- Use a pizza cutter to trim the dough edges, then divide the dough in half lengthways. Mark off small cuts, 4 in (10 cm) apart, along one edge of each dough half – then do the same on the other side, but mark in between the first cuts. Using these points as a guide, cut diagonally across the dough to make long triangles. Gently pull the edges out to make them even. (See the process photos above for a visual on how to cut and shape your croissants).
- Line two baking trays with parchment paper or silicone baking mats. Form the croissants. With the pizza cutter, make a small incision on the fat end of a dough triangle.
- Gently stretch apart the two edges to form an adorable little Eiffel Tower! Each tip of your tower will be visible as the outside edges of your croissants, so go easy to preserve the lamination as much as possible while doing this step.
- Roll up each side of the tower’s base to meet at the end of the incision, then use your palm to gently begin rolling the croissant up. You want to be firm, but not too tight in the roll, so the layers have room to rise. Use your hand or a rolling pin to hold the thinner end of the tower and gently pull towards you to stretch out the pastry as you roll it up.
- When you come to the top of the tower, lightly pinch the top and roll the croissant over to adhere it on. (A dab of water can help if needed to reinforce it!) Position the croissant on a baking tray, with the tip side down. Drag the edges around to form a crescent shape. Repeat until you’ve used up all the croissant dough, making sure they’re generously spaced out on the tray. (If you want to freeze some or all of the croissants for later, do so now.)
- I’m so sorry to say, you’re not done yet. Cover the croissants with plastic wrap and allow to rise, at a room temperature no higher than 25°C (77°F), for 3–12 hours, until ballooned out and almost doubled in size. The rising time will vary depending on your home conditions, so check hourly during your first attempt, and remember that future croissant endeavours should be fairly consistent with how long that takes. When the croissants are ready for baking, you should be able to see the separate layers between the risen dough, when looking at the sides of the croissants.
- Preheat the oven to 400°F (200°C) and clear it of other baking trays. Brush the top of the croissants with cream or milk, trying to avoid the laminated edges of the croissants. Place the croissants in the oven, reduce the temperature to 350°F (180°C) and bake for 25–30 minutes, until gorgeously golden, rotating the trays halfway through cooking, brushing extra cream or milk on any spots that aren’t browning fast enough and monitoring closely towards the end (smaller croissants may need to be removed from the 15-minute mark).
- Remove from the oven and leave to cool for 10 minutes on the trays, then move to wire racks to cool fully before slicing, so the crumb can set properly. Félicitations, c’est la fin! Eat within 2 days, or use old croissants to make almond croissants (see note).
Notes
Repurpose croissants that have passed the two-day event horizon of freshness by halving them, smearing vegan Crème d’amande in the middle and closing them up again. Dunk the croissants in Rum syrup. Smear a small amount of crème d’amande on top of each croissant, and press flaked almonds on top. Resuscitate in a preheated 320°F (160°C) oven for 20–25 minutes, turning on the oven grill (broiler) for the last few minutes, until the almonds are gorgeously toasted.
Nutrition
Vegan croissants recipe shared with permission from The Vegan Baker by Zacchary Bird, published by Smith Street Books, October 3 2023. Process steps and recipe card photos by Emily Weaving.
You may also like...


Get Our FREE Vegan Shopping List
Whether you love it or hate it, we all have to go grocery shopping, and it can be a little intimidating when you first start eating vegan. Our beginner-friendly shopping list includes all the grocery essentials you'll need make many satisfying vegan meals! You'll also receive a blank shopping list you can customize yourself, plus our weekly e-newsletter with delicious plant-based recipes.
Leave a Comment
Yum! My favorite breakfast on Saturday mornings! Thanks for this great list!
Yum! My favorite breakfast on Saturday mornings! Thanks for this great list!
Love this so helpful, I love croissants
Love this so helpful, I love croissants
Nothing better than a vegan croissant 🙂
Need to try whole foods’s croissants asap!
Now that I think about it, I don’t think I’ve had a croissant since going vegan. So happy to see vegan options available! Making a note to add vegan croissants to my shopping list 🙂
What a great guide about croissants! I haven’t eaten any since before going vegan, so I’m very excited that these are dairy-free and egg-free. Yay!